Air Fried Clam Strips

While putting together my recent Walden Local Meat share I noticed they had a special add-on – clam strips. Apparently these are only a limited time add-on and only available at the end of the summer. I decided to try them because why not!

  • Ingredients:
  • Clam strips (unsure how many Walden gave me but it was A LOT)
  • House Autry Air Fry Chicken Seasoning (it comes in a bag)
  • Evaporated milk (lactose-free)
  • Smoked paprika
  • Salt
  • Pepper
  • Olive oil spray
  1. Pat dry the clam strips and try to separate them as much as possible using a fork (most will stick together and that’s okay!).
  2. Pre-heat air fryer to 380 degrees F. for 3 minutes.
  3. Mix seasoning with smoked paprika, salt, and pepper.
  4. Put your milk in a bowl, the seasoning on a plate, and have the air fryer basket ready to go (spray basket with olive oil spray).
  5. Dip a few clam strips at a time into the milk, shake off the excess, then drop them into the seasoning and make sure each piece is covered.
  6. Drop prepared clam strips into the air fryer basket as you go. Do a few at a time. Don’t overcrowd the basket too much. Spray entire basket with the clams inside with olive oil spray to make sure they end up crispy.
  7. Cook for 3 minutes at 380 degrees F.
  8. Shake the basket or use tongs, spray again, then cook for an additional 3 minutes, still at 380 degrees F.
  9. After the final 3 minutes these babies are ready to eat!
Perfectly crispy!

These came out delicious! Easy finger food or pair them with a salad. They also go well with a beer since they’re a bit salty and crunchy. Since every air fryer is different you may want to try them at 380 degrees first for the total of 6 minutes, however, keep an eye on them after the first 3 minutes. Some air fryers run exceptionally hot so you may only need a max of 4-5 minutes in there. Very easy to make and great if you want either a snack or a light meal. Walden needs to start carrying these more often!

https://waldenlocalmeat.com/

If you’re interested in trying Walden Local Meat, send me a message!

Posted in Cooking, Uncategorized | Tagged , , , , | Leave a comment

Brooklyn Blackout Cake

For Mother’s Day this year my mother had one request – Brooklyn Blackout Cake. She had not had it in what felt like forever and I decided I was up to the challenge – and a challenge it was! From start to finish this cake took nearly five hours to complete. If you’re going to make this, devote an afternoon to it. With that said, below is my take on this cake (I combined three different recipes to make this happen).

  • Cake Ingredients:
  • 1/2 cup Dutch-processed cocoa powder
  • 2 tablespoons boiling water
  • 2 ounces unsweetened chocolate, chopped
  • 3/4 cup whole milk
  • 1 cup (2 sticks) unsalted butter, softened
  • 2 cups sugar
  • 4 eggs, separated
  • 2 teaspoons vanilla extract
  • 2 cups AP flour
  • 1 teaspoon baking powder
  • 1 teaspoon baking soda
  • 1 teaspoon salt
  • Filling Ingredients:
  • 1 tablespoon + 1 3/4 teaspoons Dutch-processed cocoa powder
  • 2 cups boiling water
  • 3/4 cup + 1 tablespoon + 1/2 teaspoon sugar
  • 1 ounce bittersweet chocolate, chopped
  • 3-4 tablespoons corn starch dissolved in 2 tablespoons very cold water
  • 1/4 teaspoon salt
  • 1 teaspoon vanilla extract
  • 2 tablespoons unsalted butter
  • Frosting Ingredients:
  • 12 ounces semisweet chocolate, chopped
  • 12 tablespoons (1.5 sticks) unsalted butter
  • 1/2 cup sugar
  • 1/2 cup hot water (not boiling)
  • 1 tablespoon light corn syrup
  • 1 tablespoon vanilla extract
  1. Make the cake: place cocoa powder in a small bowl and whisk in the boiling water until it forms a paste.
  2. Combine unsweetened chocolate and milk in a small saucepan over medium heat, stir until the chocolate completely melts and remove from heat. Whisk a small amount of the hot chocolate milk into the cocoa paste to warm it. Whisk the cocoa mixture into the milk mixture. Return the saucepan to medium heat and stir for one minute, remove and set aside to cool slightly.
  3. Preheat oven to 375 degrees F.
  4. Butter and flour two 8-inch round cake pans.
  5. In a mixer, cream the butter and sugar. Beat in egg yolks (one at a time). Add vanilla. Remove from mixer and stir in chocolate mixture.
  6. Combine flour, baking powder, baking soda, and salt. Slowly add flour mixture to the chocolate mixture, folding in until just combined.
  7. In another bowl, beat the egg whites until soft peaks form. Gently fold the egg whites into the batter. Divide the batter between the two prepared pans. Bake until a toothpick in the center of both cakes comes out clean, about 45 minutes.
  8. Cool the cakes in their pans, on a cooling rack for 15 minutes. Remove cakes from pans and continue to cool.
  9. Make the filling while the cakes are baking: combine the cocoa powder and boiling water in a small saucepan over low heat. Stir in sugar and chocolate. Add dissolved corn starch paste and salt to the saucepan and bring to a boil, stirring constantly. Boil for 1 minute. Remove saucepan from heat, whisk in vanilla and butter, transfer mixture to a bowl. Cover and refrigerate until cool.
  10. Make the frosting: melt the chocolate in a double boiler, stirring until smooth. Remove the top of the double boiler and whisk in butter (1 tablespoon at a time). Return to heat if necessary to melt the butter completely.
  11. Whisk in hot water, all at once, until smooth. Whisk in corn syrup and vanilla. Whisk in sugar until all combined.
  12. Cover and refrigerate for 15 minutes. Remove from refrigerator, stir, re-cover, and let it sit on counter for about 15 minutes until it forms a smooth working consistency.
  13. Assemble the cake: using a sharp serrated knife slice each cake horizontally in half to form 4 layers. Set 1 layer aside for crumbling.
  14. Place one layer on a cake round or plate. Generously coat top of layer with filling. Add second cake layer, repeat with filling on top. Add third layer, put a very thin coat of filling on top. Refrigerate for 10 minutes.
  15. Remove from refrigerator. Frost top and sides of cake with frosting. Crumble remaining layer and using your hands liberally apply crumbs to side and top of cake. Store in a cool place.

This came out delicious (and beautiful). I would definitely make this again but it did wipe out my energy for the day!

Posted in Baking | Tagged , , , | 1 Comment

Pan-Roasted Swordfish with Butter Sauce

I recently ordered two swordfish steaks from Walden Local Meat. In the past their seafood has been just as fresh and tasty as their meat therefore I figured let me try their swordfish. I went online to find a recipe that was good for an after-work dinner and found this one from Epicurious. I ended up making a few small changes based on what I like and it still came out delicious.

  • Ingredients:
  • 1/2 stick butter (I used plant based sine I had it on hand), room temp.
  • 2 teaspoons dried parsley
  • 2 garlic cloves, minced
  • 1 teaspoon McCormick Montreal steak seasoning
  • Salt
  • Olive oil
  • 2 swordfish steaks
  1. Preheat oven to 400 degrees F.
  2. In a small bowl, mash butter, parsley, steak seasoning, and salt.
  3. Heat olive oil in a heavy ovenproof pan (I used cast iron) over medium heat. Sprinkle swordfish with salt and steak seasoning (NOT from the items in the bowl). Add swordfish to skillet and cook until slightly browned, about 3 minutes.
  4. Turn swordfish over and immediately put into preheated oven. Cook for about 10 minutes, until just cooked through.
  5. Transfer swordfish to plates.
  6. In the same pan you used in the oven, put your seasoned butter. Cook over medium heat until butter is completely melted and bubbling. Scrape up any brown bits that form. Pour butter sauce over swordfish and serve.

Very very yummy and we even ended up putting the extra butter sauce over the rice we made on the side. Made for a quick meal which is especially good after a long day of work.

Posted in Cooking, Uncategorized | Tagged , , , , | Leave a comment

Vegan Alfredo Sauce

One of the Christmas gifts I received was an Almond Cow machine. As someone who tries to stay away from dairy as much as possible – it has definitely been used a lot! What I love about it the most, however, is actually not the milk (it’s delicious but let me finish) but the pulp! The filter basket on the machine retains the pulp from almonds, cashews, pecans, etc. and you can use that as a primary ingredient in tons of other dishes. I had already made cornbread using the pulp from almond milk I made but I had always read about using cashews as a vegan substitute for alfredo sauce. I figured, hey, why not and went to Whole Foods to purchase ALL the cashews and get to work. While Almond Cow does provide their own recipe for this, I modified it a bit.

  • Ingredients:
  • 3/4 stick vegan butter (I used Country Crock plant butter made with olive oil)
  • 5 cloves garlic, minced
  • 1.5 cups full-fat coconut milk
  • 1/2 cup cashew pulp (from cashew milk made in your Almond Cow or however you usually make cashew milk for yourself)
  • 2.5 tablespoons nutritional yeast (add more or less depending on how much you like a cheesy flavor in your sauce)
  • salt & pepper, to taste
  1. Melt vegan butter and garlic in a saucepan on medium-low heat for 3-5 minutes (don’t let your butter burn!).
  2. Add coconut milk to the butter/garlic mixture and cook until it starts to thicken (5-7 minutes).
  3. Add mixture to blender with the cashew pulp, nutritional yeast, and salt & pepper. Blend until smooth and creamy (2-3 minutes).
  4. Taste and adjust s&p as you see fit. You can also add more nutritional yeast if you would like.
  5. If the sauce tastes the way you like it, toss it with some pasta. I used Banza pasta because it’s chickpea based and way healthier all-around.

This came out just as creamy as real deal alfredo sauce. It’s a very yummy alternative if you want to cut back on dairy or if you don’t consume dairy whatsoever. I’m not a vegan by any means (I get a monthly meat delivery, for context) but I also don’t consume cow’s milk, ice cream, etc. so this was a great alternative for me. Super easy to make and allows you more room to customize the flavor profile of your sauce.

Posted in Cooking, Uncategorized | Tagged , , , , | 1 Comment

Air Fried Chicken Wings

Chicken wings are one of my favorite things to add-on to my monthly Walden delivery. They provide 5 pounds of wings for a small amount of money and they are the easiest thing to make in the air fryer. I am now the proud owner of two air fryers and my larger one is my go-to for wings since it holds far more than my smaller one. Below is my recipe for frying the wings, as well as how I get the perfect BBQ sauce to toss them in.

  • Ingredients for wings:
  • 3-5 pounds chicken wings (based on the size of your air fryer and whether or not you want to cook in batches)
  • Salt
  • Black Pepper
  • Smoked Paprika
  • Garlic Powder
  • Cajun Seasoning (optional but if you like a kick you need this)
  • 2 tablespoons baking powder (NOT baking soda – that would taste horrific)
  • Olive oil spray
  1. Preheat air fryer to 380 degrees F.
  2. Toss chicken wings in a large bowl with salt, pepper, paprika, garlic powder, Cajun seasoning (if using), and baking powder. Baking powder is what makes air fried wings crispy. Trust me on this one.
  3. Spray basket of air fryer with olive oil spray and add wings to basket, spray wings with olive oil spray
  4. Fry at 380 for 10-13 minutes (all fryers run differently)
  5. Shake basket or toss with tongs, spray wings with olive oil again
  6. Fry at 380 for 8-12 minutes
  7. Shake or toss again and spray wings one more time
  8. Fry at 400 (you want to crank the heat for the last round of frying) for 5-7 minutes
  • Ingredients for BBQ Sauce:
  • Sweet Baby Ray’s BBQ sauce (I use a mix of the honey and hickory sauces, use as much or as little as you’ll like tossed on your wings) or Pioneer Woman BBQ Sauce
  • 2-3 tablespoons melted butter
  • Hot sauce, to taste
  1. In a medium-size sauce pan, bring the BBQ sauce, butter, and hot sauce mixed together to a boil
  2. Allow to simmer for 5-10 minutes
  3. Toss the wings with the BBQ sauce mixture in a large mixing bowl. The sauce will be hot, as will the wings, so use tongs to do this part
  4. Serve hot
Yum

Easiest recipe ever.

Posted in Cooking | Tagged , , , | 4 Comments

Kreatopia (Greek Meat Pie)

Phyllo dough is one of those things that had always intimidated me. I had always heard it cracked easily, you had to keep it moist while working with it, don’t let it thaw too much, etc. But when I saw this recipe I knew I had to finally conquer my fear and buy a box of phyllo dough from the Greek supermarket and get to work. A damp dish towel is your best friend while working with phyllo. Keep the towel over the sheets while layering and your dough will be just fine.

  • Ingredients:
  • Olive oil
  • 2 medium onions, diced
  • 1 pound ground pork, 3/4 pound ground beef (you can also do all beef or all pork if you prefer)
  • Oregano
  • 1 teaspoon dill, chopped
  • Pepper
  • Salt
  • 2 teaspoons tomato paste
  • 1/4 cup red wine (I used cabernet)
  • 1/4 beef broth (you can also use chicken broth)
  • 3/4 cup feta, crumbled
  • 1 egg
  • 1 stick butter, melted
  • 1 pound box phyllo dough, thawed at room temp.
  1. In a pan over medium-low heat, warm up some olive oil
  2. Add in the onions and cook until soft and translucent
  3. Add in the ground meat (pork & beef, all pork, all beef, whatever you prefer!), break apart, and brown
  4. Once the meat is brown, add in the oregano, dill, pepper, salt, and tomato paste. Mix it all together
  5. Add in the red wine and reduce
  6. Add in the beef (or chicken) broth and reduce
  7. Once all the liquid has been reduced remove from heat and empty into a large mixing bowl
  8. Add in the feta and the egg – mix well
  9. Preheat oven to 350 degrees F.
  10. Brush a 9×13 baking pan with some melted butter
  11. Unroll the phyllo sheets and lay them flat. Drape a damp dish towel over the sheets in-between use
  12. Cut the phyllo sheets to the size of your baking pan
  13. Take one sheet and lay it in the pan
  14. Brush with some melted butter (paying extra attention to the corners and edges) and lay down another sheet
  15. Repeat this six more times (you should have 8 sheets at the bottom)
  16. Pour the meat mixture over the phyllo in the pan and smooth out evenly
  17. Now repeat the steps where you laid down the sheets of phyllo. You should have 8 sheets left, use them all on the top of the meat mixture. Phyllo, butter, phyllo.
  18. When done, score the top and place it in the oven for 30-40 minutes or until golden brown
  19. Remove, cut, and serve hot!
Right before going into the oven
Fresh out of the oven
Sliced and ready to eat!

This was a much easier meal to make than I ever expected it to be. It also made good use of the ground meat I had from Walden Local Meat.

Posted in Baking, Cooking | Tagged , , , , | Leave a comment

Seared Scallops

As much as Walden Local Meat is known for their beef, chicken, and pork products, they also offer seafood as an add-on to your monthly share. I had been eyeing their seafood add-ons for the past couple of months and finally decided to throw in some scallops to my July share. I’m glad I did because not only were they generous with the portion size but the scallops were some of the freshest I’ve ever had.

  • Ingredients:
  • 20-24 scallops
  • 3 teaspoons butter
  • Olive oil
  • Kosher salt
  • Freshly ground black pepper
  1. If your scallops are not already cleaned up and still have the muscle that wraps around them, remove that first using your thumb and index finger. Mine were already removed by the time I received them but you never know.
  2. Pat dry the scallops and season both sides with kosher salt and black pepper.
  3. Add the butter and oil to a cast iron pan on high heat. Once the butter is melted and everything starts bubbling, gently add the scallops making sure they do not touch one another, reduce the heat to medium.
  4. Sear the scallops on each side for about 2 minutes, or until they have a golden crust.
  5. Serve immediately.

IMG_20200727_184420_329

These were so easy to make and fast, too! Definitely a recipe to keep handy for when we finally return to the office and the commute that comes along with it.

Posted in Cooking | Tagged , , , | Leave a comment

Chicken Thighs with Tomatoes and Feta

I love one pan recipes. They’re simple, somewhat fast, and there’s less clean-up involved. This is also the first recipe in a while that I did not use meat supplied by Walden simply because my next delivery isn’t until this Friday (insert crying emoji here).

  • Ingredients:
  • 4-6 chicken thighs, skin-on bone-in
  • Kosher salt
  • 2 pints cherry tomatoes
  • Harissa powder & harissa paste (you can make the paste from the powder by incorporating olive oil)
  • 3 tablespoons red wine vinegar
  • Dried oregano
  • 4 ounce block of feta
  • Crusty bread (for serving)
  1. Pat chicken thighs with paper towels, season with salt and harissa powder (this is VERY spicy so be careful) all over. Arrange chicken skin side down in a cold cast iron skillet. Set over medium heat and cook chicken undisturbed until skin is very deep golden brown and easily releases from the pan (20-25 minutes). Transfer chicken to a plate, skin side up.
  2. Combine tomatoes, harissa paste, vinegar, oregano, and salt (to taste) in the same skillet. Increase heat to medium-high and cook, stirring occasionally, until tomatoes burst and their juices begin to thicken (8-10 minutes).
  3. Nestle chicken thighs into tomatoes skin side up. Cook on medium-high for about 10 minutes then reduce the heat to medium, bring to a simmer, and cook until chicken is cooked through (20-25 minutes). Each skillet is different so keep an eye on the chicken to make sure it’s cooked and not burning. You may also flip the chicken skin side down halfway through cooking.
  4. Remove from heat and break the feta into large pieces scattered over the chicken. Some pieces will stay intact while others will melt into the sauce ever so slightly. Sprinkle additional oregano over the top.
  5. Serve with bread.

IMG_20200721_184322

Complete!

This was very delicious and I love how easy it is to customize to make it your own. Like I mentioned earlier in this post, be sure to watch how much harissa you use. I LOVE spice but even I know a little too much will ruin the entire recipe. It’s also very important to use a cast iron skillet (mine is over 70 years old!) since it seals in the flavor and heats evenly.

Posted in Cooking | Tagged , , , , , , | 1 Comment

Crock Pot Oxtail Stew

Ever since signing up for Walden Local Meat I have been cooking a lot more at home. Part of the reason I have been cooking more is also because I’ve been working from home since March. Regardless, Walden has given me the opportunity to purchase and cook different cuts of meat that I cannot necessarily find in the grocery store. For this month’s share I added oxtail and was overjoyed when it arrived. Side note: oxtail in your every day supermarket is mostly bone and fat, the ones from Walden have a good chunk of meat on them.

  • Ingredients:
  • Olive oil
  • 2-3 pounds beef oxtail
  • 1.5 pounds russet potatoes, peeled and and cut into chunks
  • Baby carrots cut in half (you can play with the amount of these)
  • 1 yellow onion, chopped
  • 1 (15 oz.) can tomato sauce
  • 1 cup beef broth
  • 3/4 cup dry red wine
  • 2 tablespoons chopped fresh parsley
  • 1 tablespoon Worcestershire sauce
  • Dried thyme
  • 1 teaspoon smoked paprika
  • 1.5 cups frozen peas
  • Salt & Pepper, to taste
  1. Heat oil in a cast iron pan. Cook oxtail for about 4 minutes on each side, until browned. Transfer oxtail to a Crock Pot (slow cooker).
  2. Add potatoes, carrots, onion, tomato sauce, beef broth, red wine, parsley, Worcestershire sauce, thyme, and smoked paprika to Crock Pot.
  3. Cook on low for 7 hours.
  4. At the 7 hour mark, add the peas, some salt & pepper, and stir. Cook on low for 1 more hout.
  5. Season with more salt & pepper (as needed) and ladle into bowls.

IMG_20200615_094250

Right before putting the lid on and starting to cook.

IMG_20200615_174923

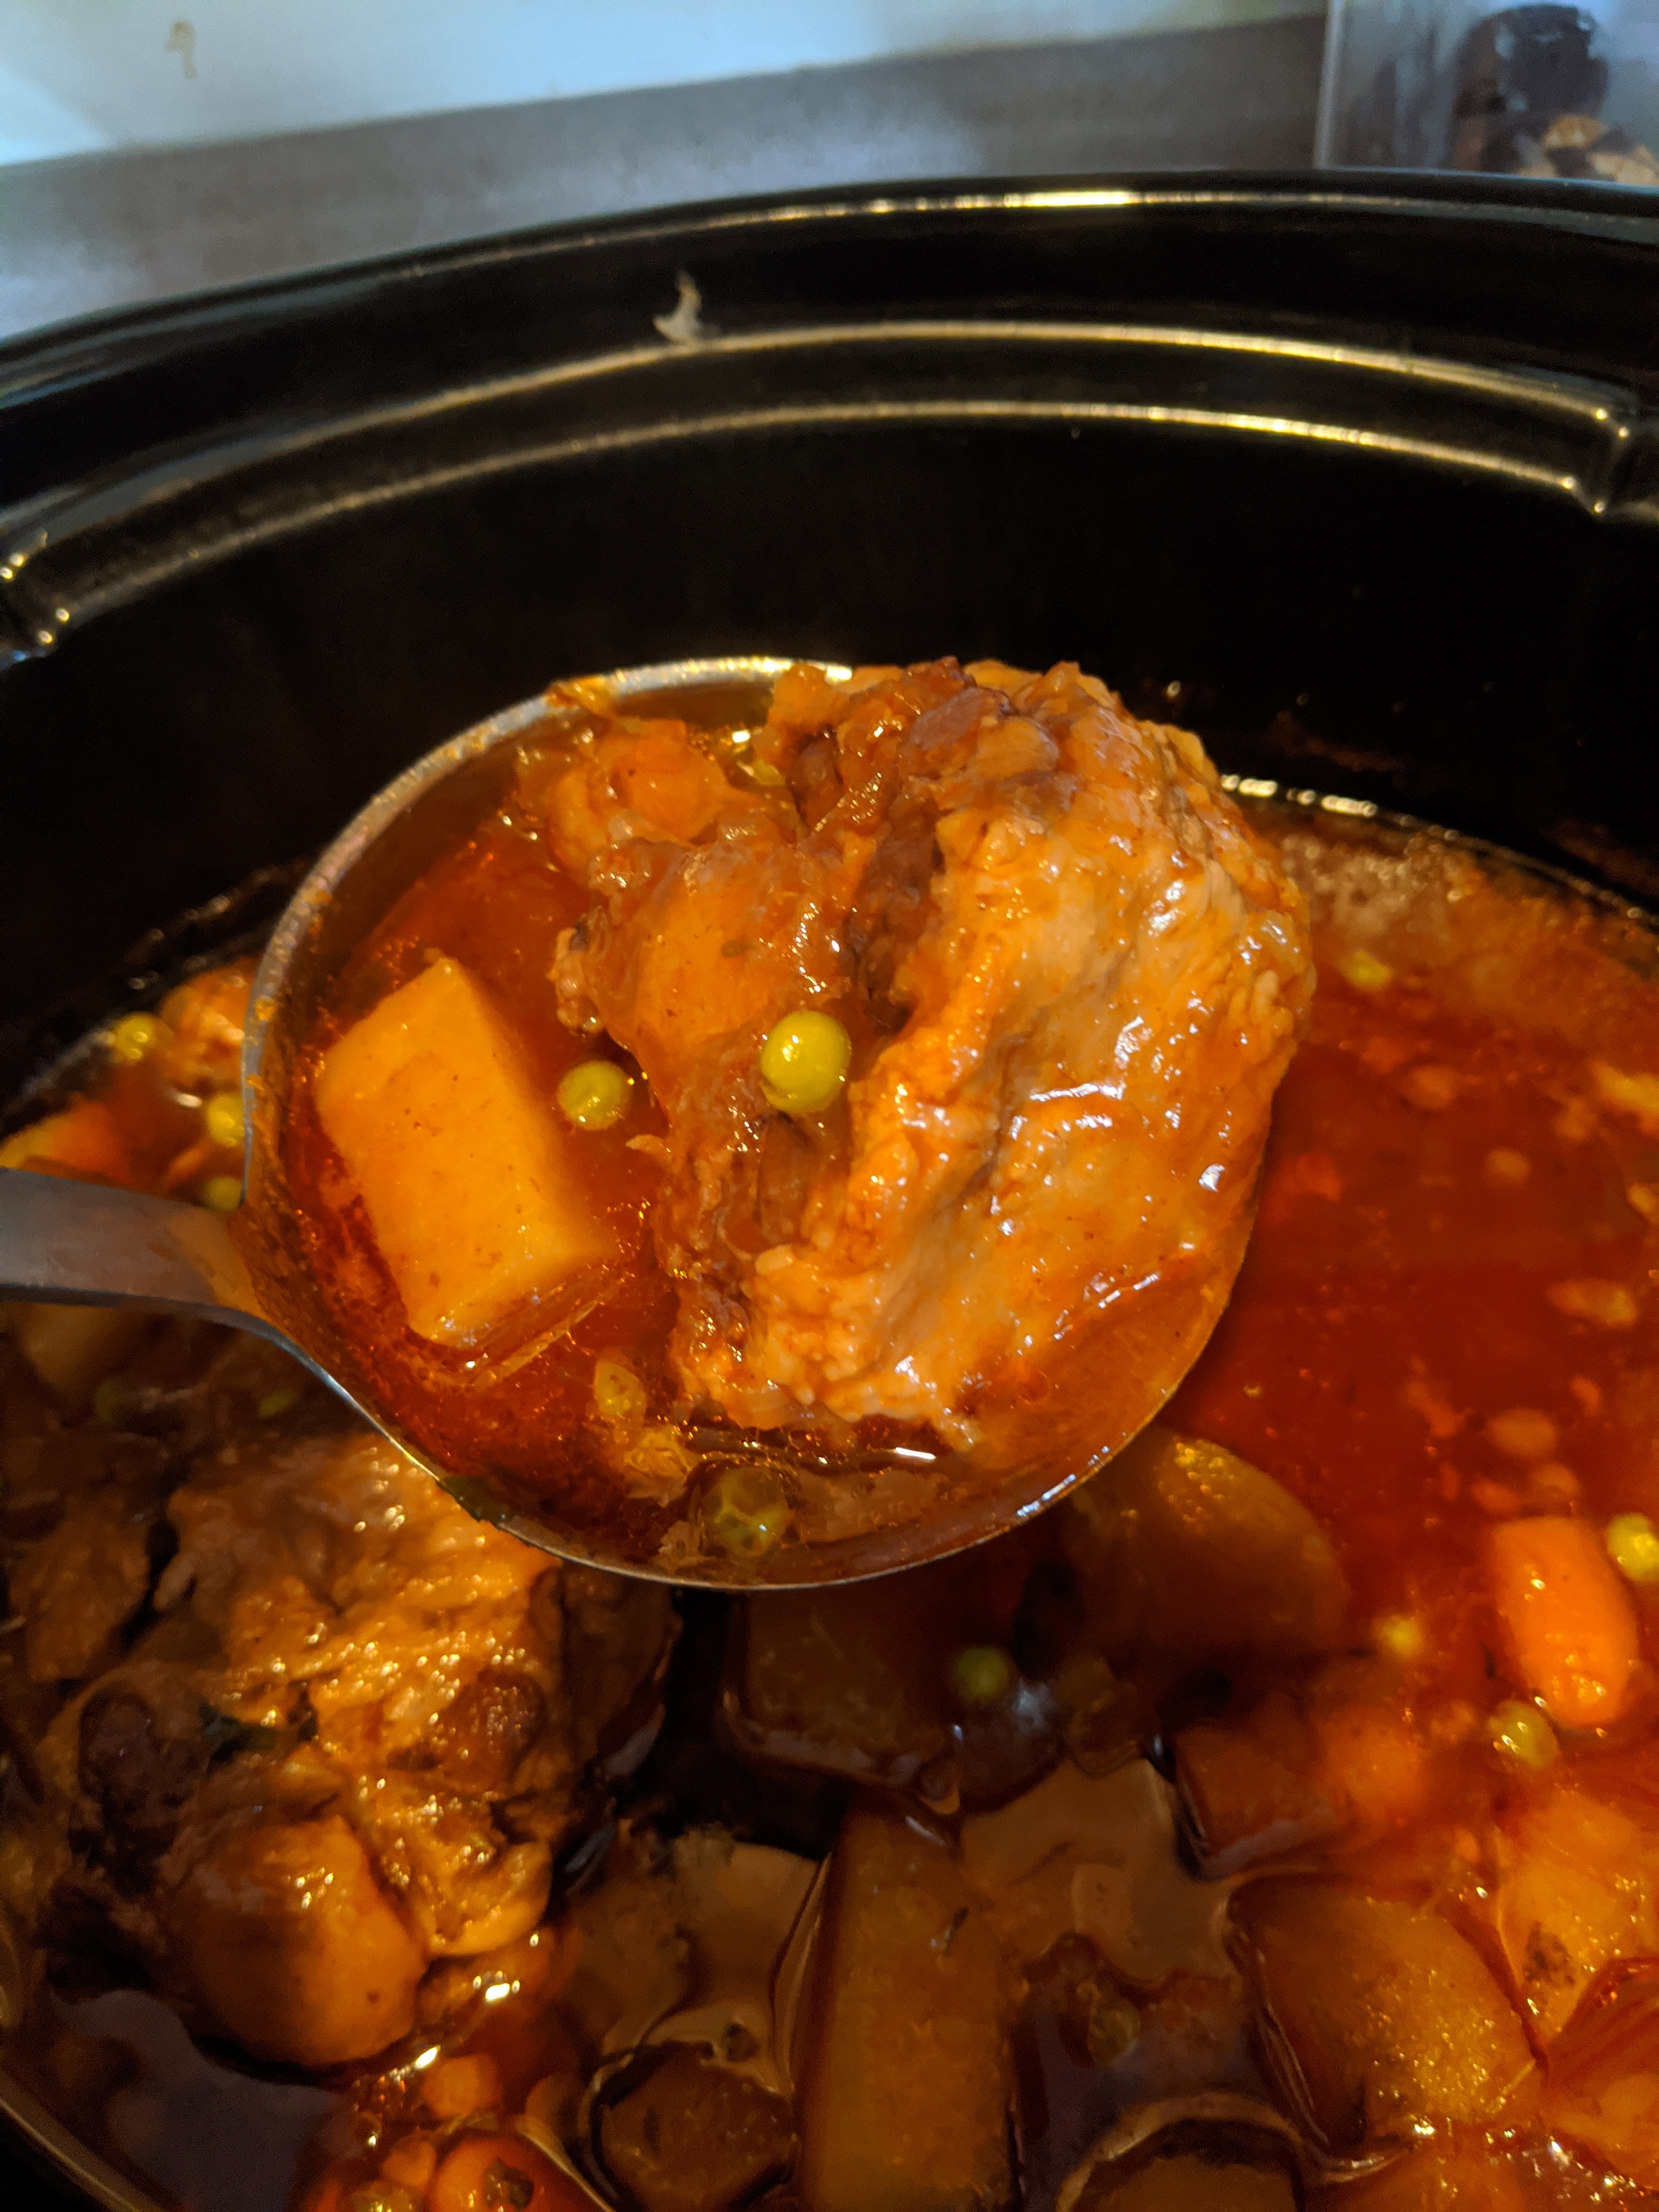
Meat, not just fat & bone.

IMG_20200615_175506

The stew itself was even delicious!

Super easy to make. Something a bit on the healthier side. Great on a day that isn’t too hot outside but you still want something along the lines of comfort food.

Posted in Cooking | Tagged , , , , , , , , , | Leave a comment

Beer Bread

There’s a reason I made beer bread. That reason is I was recently given a Danish Dough Whisk which I really wanted to try (it’s awesome btw) and I really like beer and always have it on-hand at my house. The primary reason I made beer bread, however, is because I love science and a bread where you DON’T need self-rising flour OR yeast is right up my alley.

  • Ingredients:
  • 3 cups all-purpose flour
  • 3 teaspoons baking powder
  • 1 teaspoon salt
  • 1/4 cup sugar
  • 1/4 cup grated parmesan cheese (optional or sub with a cheese you prefer)
  • 1 12 oz. can beer (I used Blue Point’s Summer Ale but any beer will do), room temp.
  • 5 tablespoons butter, melted
  1. Preheat oven to 375 degrees and grease a loaf pan.
  2. Mix together dry ingredients and slowly pour in the beer of your choice.  The beer will foam but it’s pretty cool to watch as it attaches itself to the dry ingredients. Add your cheese or omit if you don’t want cheese at all.
  3. Use your dough whisk (or any utensil you typically use for dough) to combine all ingredients until the beer is no longer foamy and has been absorbed by the dry ingredients, forming a dough.
  4. Pour dough into prepared loaf pan.
  5. Pour melted butter over the top of the dough.
  6. Put dough in the oven and bake for 1 hour.
  7. After 1 hour, remove from oven and take the dough out of the loaf pan immediately. Allow to cool on a wire rack for at least 15 minutes prior to slicing.

IMG_20200521_182625

A beautiful bread!

IMG_20200521_190237

This was incredibly easy to make and very very delicious. There are so many variations you can make from different cheeses to herbs to plain ol’ black pepper. It’s even better the next day!

Posted in Baking | Tagged , , , | Leave a comment